
Wall Tiling Tutorial: Achieve Flawless Results Step-by-Step
Wall Tiling Tutorial: Achieve Flawless Tiling Results
Wall Tiling Tutorial: Did you know that over 60 percent of DIY tiling projects fail due to poor surface preparation or inaccurate layout? A beautifully tiled wall not only adds value but also brings a crisp, lasting look to any room. Creating a flawless finish starts well before the first tile goes up and each step builds on the last. This guide empowers you with detailed methods, trusted pro tips and practical advice so you can achieve a professional result with confidence.
Table of Contents
- Step 1: Prepare Walls And Gather Materials
- Step 2: Mark Layout Lines And Plan Tile Placement
- Step 3: Apply Adhesive And Position Tiles
- Step 4: Cut Tiles For Edges And Corners
- Step 5: Grout Joints And Clean The Surface
- Step 6: Inspect And Finalise Your Tiled Wall
Quick Summary
| Key Point | Explanation |
|---|---|
| 1. Prepare walls properly for tiling | Assess and prime surfaces according to their type for optimal tile adhesion and durability. |
| 2. Use layout lines for tile placement | Mark center and layout lines to ensure tiles are symmetrically placed and avoid narrow cuts. |
| 3. Apply adhesive with care | Choose an appropriate adhesive method and ensure even application to secure tiles effectively. |
| 4. Cut tiles accurately for edges | Use the right tools for cutting tiles to fit complex areas, ensuring a professional finish. |
| 5. Grout and seal for a polished look | Fill tile joints completely and seal edges to safeguard against moisture and enhance aesthetics. |
Step 1: Prepare Walls and Gather Materials
When you start your wall tiling project, your first priority is setting up the right foundation. Proper wall preparation transforms an average tiling job into a professional result that looks stunning and lasts for years.
Begin by assessing your wall surface carefully. According to research from Victorian Plumbing, different wall types require specific preparation techniques. Fresh plasterboard needs an acrylic-based primer applied in two coats, allowing overnight drying between applications. This prevents moisture absorption and creates a stable surface for your tiles.
For painted walls, you will need to invest some time in surface preparation. Sand down any glossy areas to create a slightly rough texture that helps tiles adhere better. Check for cracks or uneven patches and repair them with suitable wall filler. Once repairs are complete, apply a primer designed for tiling to ensure maximum adhesion.
Pro Tip: Always wear protective goggles and a dust mask when sanding or doing wall repairs to protect yourself from debris.
Gather all your materials before starting. You will need:
Here’s a comparison of wall preparation steps for different wall types:
| Wall Type | Preparation Steps |
|---|---|
| Fresh plasterboard | Apply acrylic-based primer 2 coats, overnight drying |
| Painted wall | Sand glossy areas Repair cracks/holes Apply primer for tiling |
| All wall types | Remove dust/debris Protect floors Gather required materials |
- Acrylic-based wall primer
- Sandpaper (medium and fine grit)
- Wall filler
- Scraper
- Paint roller or brush
- Dust sheets
- Protective gear
This meticulous preparation sets you up for a smooth tiling experience. Get ready to transform your wall into a perfectly primed canvas for beautiful tiles.
Step 2: Mark Layout Lines and Plan Tile Placement
The success of your tiling project hinges on precise layout and strategic planning. This step transforms your wall from a blank canvas into a perfectly mapped surface ready for beautiful tiles.
According to research from Home Building, finding the true centre of your wall is crucial. Begin by carefully measuring the wall width and height. Use a spirit level to create a precise centre cross that will serve as your primary reference point. This approach prevents wonky edges and helps you avoid those frustrating narrow tile cuts that can ruin the overall aesthetic.
Before setting a single tile, perform a dry layout. Spread your tiles on the floor or a large flat surface and arrange them exactly as they will appear on the wall. This rehearsal helps you anticipate potential challenges and make intelligent adjustments. Look for opportunities to minimise awkward slivers of tiles at wall edges by subtly shifting your starting point.
Pro Tip: Always start your layout from the centre point and work outwards. This creates visual symmetry and ensures a professional finish.
Your layout lines are your roadmap. Use a long spirit level and a pencil to draw horizontal and vertical lines that intersect at your centre point. These lines will guide tile placement and keep everything perfectly aligned. Take your time with this step proper preparation prevents poor performance.
Remember that patience during layout pays dividends. A few extra minutes spent planning now will save you hours of frustration later. Your future self will thank you for the meticulous approach.
Ready to bring those perfectly planned layout lines to life? Let us move on to the exciting part of actually placing those tiles.
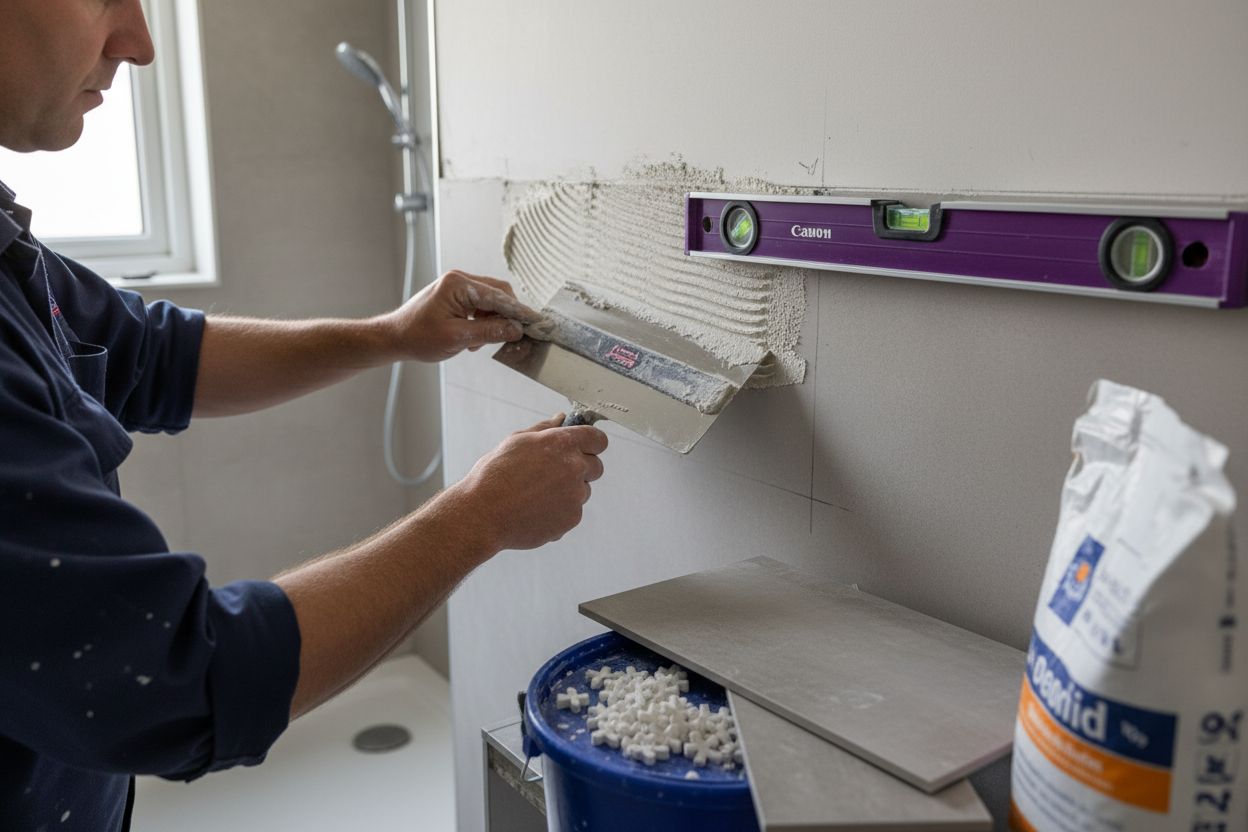
Step 3: Apply Adhesive and Position Tiles
You are now entering the most critical phase of your tiling project where precision meets skill. Applying adhesive and positioning tiles requires patience, technique and a steady hand.
According to research from Tile Tracker Tools, you have two adhesive application methods: single or double spreading. Some professionals apply adhesive to either the wall or the tile. For best results, follow the manufacturers recommended technique and work in small sections.
Begin by preparing your adhesive carefully. Research from Ideal Home recommends using a dry mixed self priming adhesive. Mix the adhesive following the manufacturers instructions and aim to cover only about one square metre at a time. This prevents the adhesive from drying before you can place your tiles.
Use a notched trowel held at a 45 degree angle to spread the adhesive evenly across your prepared surface. Create consistent ridges that will help tiles adhere properly. When placing your first tile, press it gently into the adhesive with a slight twisting motion. This helps create a strong bond and eliminates air pockets.
Pro Tip: Keep tile spacers handy to maintain consistent gaps between tiles. Remove excess adhesive immediately to ensure a clean finish.
Work methodically and systematically. Place tiles from your centre point outwards using your previously marked layout lines as a guide. Clean surplus adhesive from tile joints as you progress.
 Take your time and double check alignment with each tile you set.
A tutorial on tiling your bathroom wall can provide additional visual guidance if you need extra support during this crucial stage.
Ready to transform those carefully placed tiles into a stunning wall surface? Next we will explore the art of grouting.
Step 4: Cut Tiles for Edges and Corners
Every tiling project encounters challenging areas where full tiles simply will not fit. Cutting tiles for edges and corners transforms your raw materials into a perfect custom fit that looks professionally installed.
According to research from Victorian Plumbing, you have two primary tools for tile cutting: a manual tile cutter for straight cuts and a grinder with a tile cutting disc for more intricate shapes. Each tool serves a specific purpose and mastering both will elevate your tiling skills.
For straight cuts along walls or edges, a manual tile cutter is your best friend. Measure carefully and score the tile surface with a single confident movement. Apply gentle pressure to snap the tile cleanly along your scored line. Practice makes perfect here precision is key.
When encountering complex cuts around pipes or tight corners, a grinder with a tile cutting disc becomes essential. These areas require patience and a steady hand. Make small incremental cuts and test fit frequently to ensure accuracy.
Pro Tip: Always wear safety glasses and work gloves when cutting tiles. Flying tile fragments can cause serious injury.
Remember that not every cut needs to be perfect on the first try. Always have extra tiles on hand and take your time. Rushing leads to mistakes that can compromise your entire tiling project.
A tutorial on tiling your bathroom wall can provide additional visual guidance if you need extra support during this challenging stage.
With your tiles now perfectly cut and fitted, you are ready to move on to the final transformative stage of your project.
Step 5: Grout Joints and Clean the Surface
This is the moment that transforms your tiled wall from a collection of individual pieces into a seamless professional finish. Grouting fills the gaps and creates that polished look professional tilers are known for.
According to research from Tile Tracker Tools, patience is crucial. Wait at least 12 hours after tile placement before grouting unless you have used a quick dry adhesive. This waiting period ensures your tiles are firmly set and ready for the next stage.
Research from Ideal Home recommends mixing your grout precisely according to package instructions. Use a grout float held at a 45 degree angle to push the grout firmly into the joints. Work diagonally across the tiles to ensure complete coverage and minimize air pockets.
After applying grout to a section, wait approximately one hour. Then use a damp sponge to wipe away excess grout and clean tile surfaces. Be gentle but thorough. Your goal is clean tile faces with perfectly filled joints.
Pro Tip: Keep two buckets of water handy while grouting one for cleaning your sponge and another for rinsing to prevent grout residue from spreading across tiles.
Once the grout has dried completely seal the edges where tiles meet walls or fixtures with silicone. This creates a watertight finish and prevents moisture penetration. Take your time and apply the silicone in a smooth continuous line.
A tutorial on tiling your bathroom wall can provide additional visual guidance if you need extra support during this final stage.
Step back and admire your handiwork. You have successfully transformed your wall with professional grade tiling.
Step 6: Inspect and Finalise Your Tiled Wall
With the tiles laid and grouted, you are now entering the final stage of your tiling project. This is where precision and attention to detail will elevate your work from good to exceptional.
According to research from Ideal Home, the final stages require careful attention. Start by addressing any grout haze that might have developed during the grouting process. Use a clean dry cloth to gently polish tile surfaces and remove any lingering residue.
Research from Tile Tracker Tools recommends thoroughly checking your adhesive and grout lines. Look closely for any uneven areas or gaps that might need touch ups. Take your time during this inspection nothing transforms a tiling job more than meticulous finishing.
Next, apply silicone sealant to the edges where tiles meet walls or fixtures. Use a caulking gun for a smooth and professional application. Move slowly and steadily to create a clean continuous line. This step not only looks great but also prevents moisture penetration.
Pro Tip: Allow the silicone sealant a full 24 hours to cure completely before exposing the area to water or heavy use.
A guide to white wall tiles can provide additional insights into maintaining your newly tiled surface and keeping it looking pristine.
Step back and admire your work. You have successfully completed a professional grade tiling project that will enhance your space for years to come.
Transform Your Wall Tiling Project with Confidence
Embarking on a wall tiling journey comes with challenges such as precise layout, perfect adhesive application and flawless grout finishing. Achieving professional results means tackling these steps with the right materials and guidance. If you feel overwhelmed by measuring centre points, managing tile cuts or sealing edges these common difficulties can be prevented with expert support.

At Vividotiles, we understand your goal to create a stunning tiled wall that lasts beautifully. We offer an extensive range of high-quality tiles and tiling essentials backed by clear advice to help you through every stage from preparation to finishing touches. Start your project now with the confidence that comes from choosing trusted products and knowing help is just a click away. Discover how easy your tiling transformation can be by visiting our main site and exploring our resources and tile collections. Take the first step towards flawless walls today.

Frequently Asked Questions
How do I prepare my walls before tiling?
Begin by assessing your wall surface and applying an acrylic-based primer for fresh plasterboard or sanding glossy areas on painted walls. This preparation ensures proper tile adhesion and creates a stable surface for installation.
What is the best way to mark layout lines for tile placement?
To accurately mark layout lines, measure your wall’s width and height to find the center point, then use a spirit level to draw both horizontal and vertical lines. This step will guide your tile placement and help achieve a symmetrical look.
How should I apply adhesive when tiling?
Use a notched trowel to spread the adhesive evenly across a small area of the wall, holding the trowel at a 45-degree angle. Cover an area of about one square meter at a time to prevent the adhesive from drying before tile placement.
What tools do I need for cutting tiles around edges and corners?
You will need a manual tile cutter for straight cuts and a grinder with a tile cutting disc for intricate shapes. Mastering both tools will ensure that your tiles fit perfectly around challenging areas.
What steps should I take after applying grout?
After applying grout, wait approximately one hour before using a damp sponge to wipe off excess grout from the tile surfaces. Then, seal the edges with silicone to prevent moisture penetration and allow it to cure fully for 24 hours.
How can I ensure a professional finish after tiling?
Inspect your tiled surface for grout haze and uneven lines, polishing with a clean dry cloth to remove residue. Take your time during this final inspection to touch up any imperfections, which will significantly enhance the overall appearance.