
Floor Tiling Workflow: Achieve Flawless Tile Installation
Floor Tiling: Laying a tiled floor may seem straightforward, but even experienced DIYers face setbacks without the right approach. A poorly prepared subfloor or rushed layout can jeopardise the entire project and lead to costly repairs. For homeowners aiming for a flawless, durable tiled finish, understanding the precise steps behind a professional installation makes all the difference. This guide gives you clear, actionable instructions to help you achieve a stunning result on your very first try.
Table of Contents
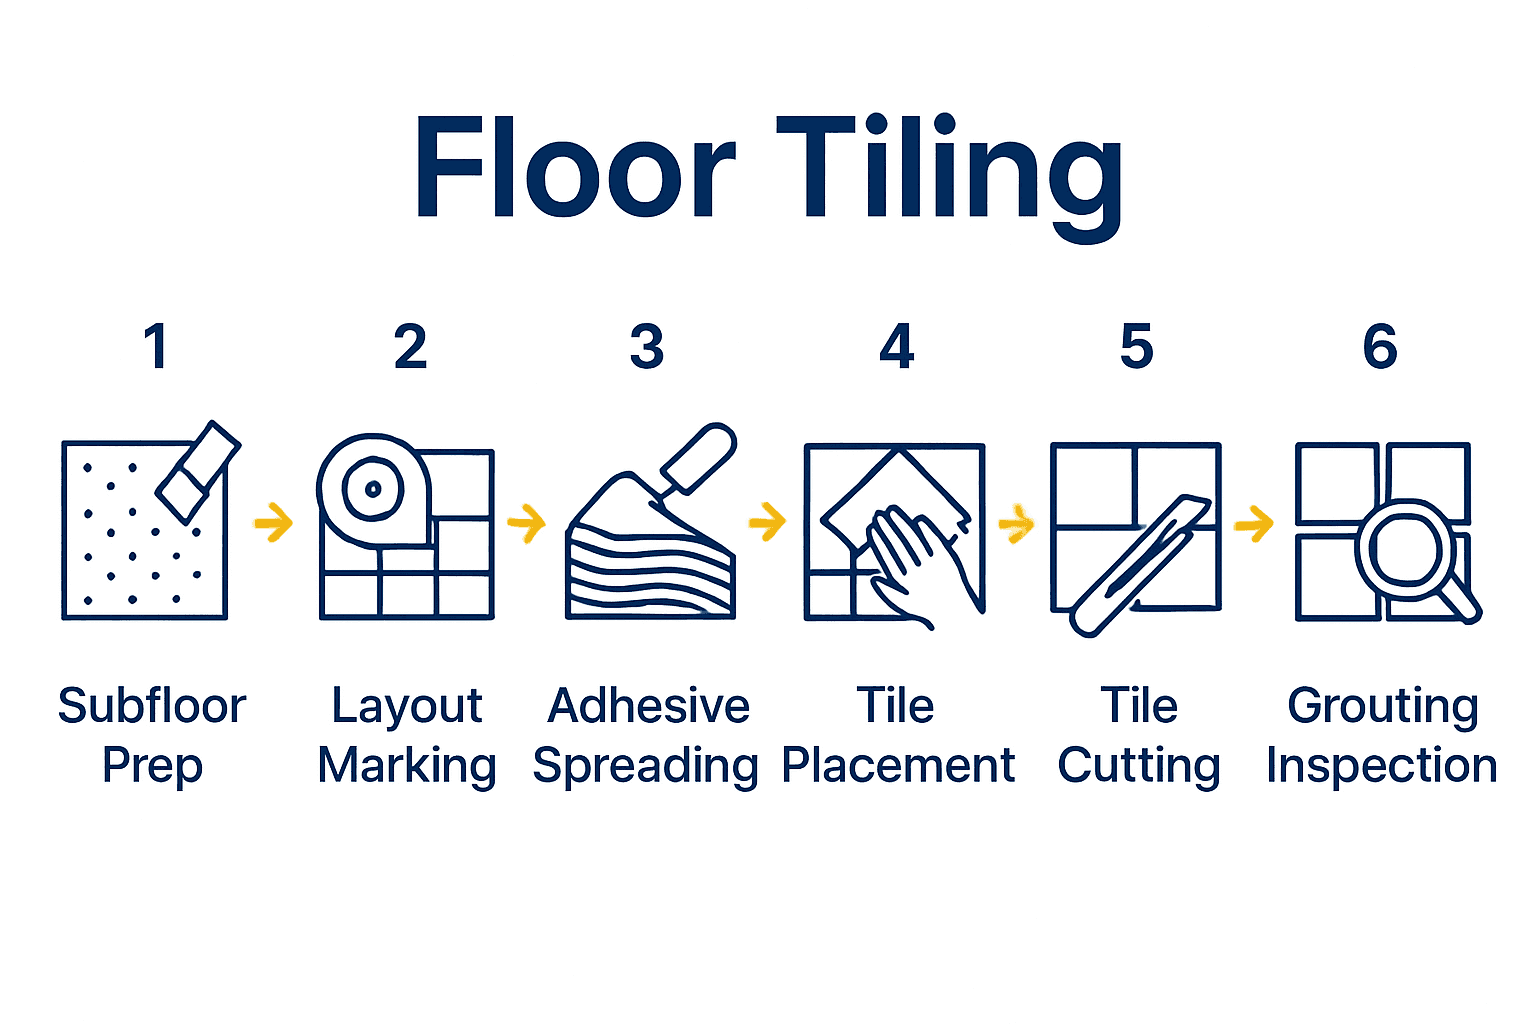
- Step 1: Assess And Prepare The Subfloor
- Step 2: Plan And Mark The Tile Layout
- Step 3: Mix Adhesive And Lay Tiles
- Step 4: Cut And Adjust Tiles For Edges
- Step 5: Apply Grout And Clean The Surface
- Step 6: Inspect And Finish The Tiled Floor
Quick Summary
| Key Point | Explanation |
|---|---|
| 1. Thoroughly prepare the subfloor | Ensure your subfloor is clean, flat, and meets standards to avoid future issues with tile installation. |
| 2. Accurately plan and mark tile layout | Find the center point of the room and create reference lines for a symmetrical tile placement to enhance visual appeal. |
| 3. Mix adhesive with precision | Follow the manufacturer’s instructions and work in small sections to keep adhesive from drying before tiles are laid. |
| 4. Cut tiles carefully for edges | Measure accurately and use proper tools to ensure tiles fit well around obstacles, leaving small gaps for expansion. |
| 5. Inspect and seal the finished floor | Conduct a detailed inspection for imperfections after grouting and apply sealant for added protection and longevity. |
Step 1: Assess and Prepare the Subfloor
Preparing your subfloor is a critical foundation for achieving a professional tile installation. Before laying a single tile, you will systematically evaluate and ready the surface to prevent future complications.
According to the Contract Flooring Association, subfloor preparation must adhere to British and EU Standards. This means creating a surface that is flat with no more than a 3mm gap under a 2m straight edge. Start by thoroughly cleaning the existing surface. Remove all debris, dust and loose particles using a vacuum and then a damp mop. Check for any existing damage like cracks or uneven areas that might compromise your tile installation.
For concrete subfloors, moisture testing is paramount. As the DIY Doctor recommends, concrete must be completely dry and potentially treated with a smoothing compound to create a perfectly level base. If you are working with wooden surfaces, ensure all boards are secure and consider adding a plywood layer to create an ultra smooth underlayment. Use a spirit level to check surface evenness and mark any areas requiring additional preparation.
Warning: Skipping proper subfloor assessment can lead to tile lippage, premature wear and potential complete floor failure. Take your time during this crucial stage.
Once your subfloor meets the necessary standards, you are ready to move forward with tile installation. The next step involves selecting and applying the appropriate adhesive for your specific tile type and surface.
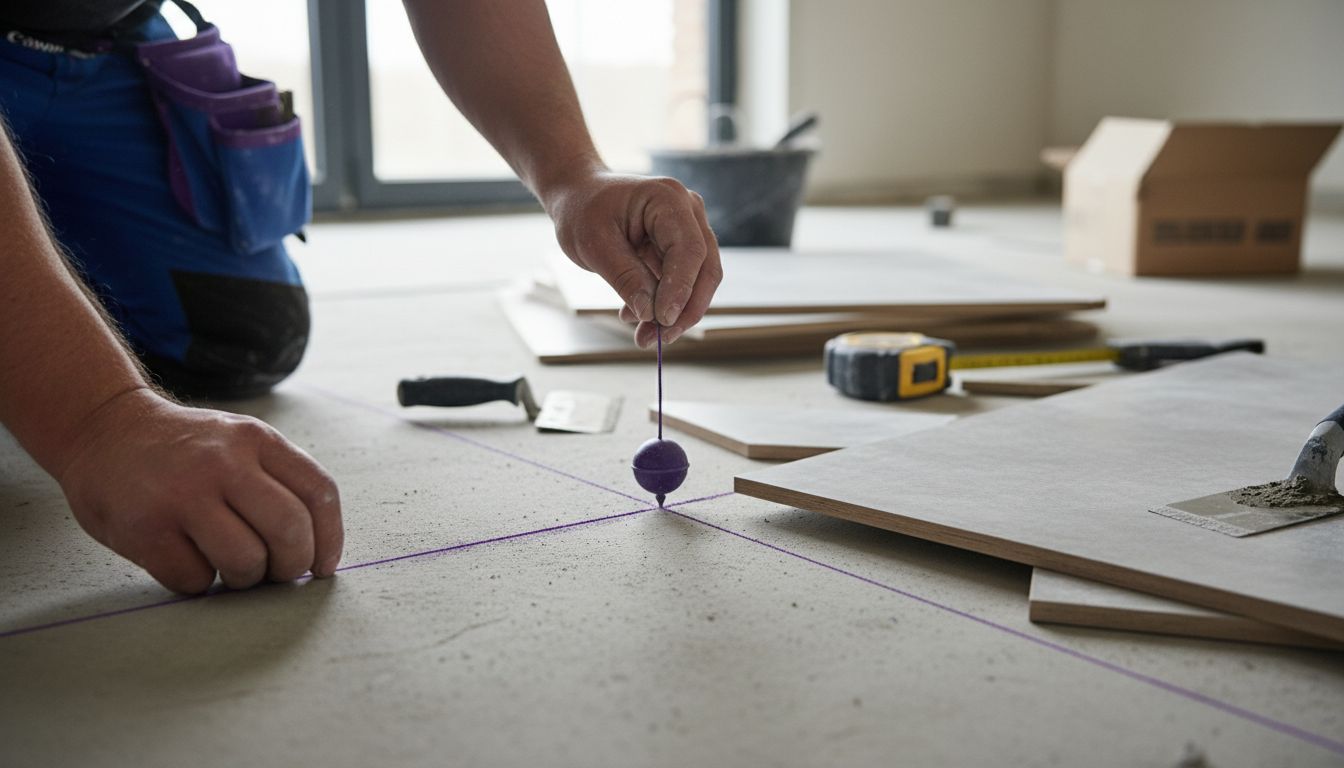
Step 2: Plan and Mark the Tile Layout
Designing a precise tile layout is your blueprint for a professional looking floor. This stage transforms your space from a blank canvas into a meticulously planned tiling project that ensures symmetry and visual appeal.
According to DIY Doctor, achieving a balanced tile layout begins with finding the midpoint of your room. Grab a long measuring tape and carefully locate the centre point of each wall. Use a chalk line or straight batten to create reference lines that intersect at this central point. These lines will serve as your primary guide for positioning tiles evenly and symmetrically.
Precision is key when marking your layout. As recommended by tiling experts, use a plumb line to ensure your vertical lines are perfectly straight. This helps prevent crooked tile rows that can throw off the entire aesthetic of your floor. Start by measuring and marking your first reference line down the middle of the room. Then create perpendicular lines to establish a grid system. Pay close attention to how tiles will fit around edges and corners, making small adjustments to minimise narrow cut tiles and create a visually balanced appearance.
Warning: Rushing through layout marking can lead to uneven tiles and frustrating adjustments later. Take your time and double-check all measurements before proceeding.
Once your layout is precisely marked, you are ready to begin the actual tile installation process. The next step involves selecting and applying the correct adhesive for a long lasting and professional finish.
Step 3: Mix Adhesive and Lay Tiles
This critical stage transforms your carefully planned layout into a beautiful tiled floor. Mixing adhesive and laying tiles requires precision technical skill and a steady hand to achieve a professional finish.
According to DIY Doctor, applying adhesive requires careful attention to technique. Start by preparing the right amount of adhesive according to manufacturer instructions. Mix thoroughly using a notched trowel ensuring a consistent texture without lumps. Hold the trowel at a 45 degree angle when spreading adhesive to create uniform ridges across your prepared surface. Work in small sections approximately 1 square metre at a time to prevent the adhesive from drying before tile placement.
Carefully position your first tiles along the reference lines you marked earlier. Press each tile firmly into the adhesive using a slight twisting motion to ensure maximum contact. Use tile spacers to maintain consistent gaps between tiles and create a professional looking grid. Work methodically across the room checking alignment constantly. A rubber mallet can help gently tap tiles into perfect position ensuring they are level and securely bonded.
Warning: Work quickly but carefully. Adhesive can begin setting within 15 to 20 minutes so plan your approach before mixing.
Once all tiles are laid, you will need to allow sufficient time for the adhesive to cure before grouting.
The next stage involves cleaning excess adhesive and preparing for the final grouting process.
Step 4: Cut and Adjust Tiles for Edges
Mastering tile cutting is the difference between an amateur and professional floor installation. This stage requires precision measuring, careful marking and strategic cutting to ensure your tiles fit perfectly around room edges and obstacles.
According to DIY Doctor, when approaching edges you must measure the space carefully and mark tiles accordingly. Start by using a robust tile cutter or wet saw with a sharp blade. Measure twice and cut once ensuring you leave a small gap approximately 5mm from walls to accommodate potential slight irregularities. For complex cuts around pipes or irregular shapes, use tile nippers to make incremental precise removals. Always wear safety glasses and work slowly to maintain accuracy.
Cutting tiles demands patience and technique. Position your tile firmly on the cutting surface and align your cutting wheel precisely along the marked line. Apply steady pressure to create a clean score before snapping the tile. For curved cuts around fixtures like toilet bases or pipework, make multiple straight cuts close together then use tile nippers to remove remaining sections. This approach creates smoother edges compared to attempting one complex curved cut.
Warning: Rushing tile cutting can result in uneven edges and wasted materials. Take your time and prioritise precision over speed.
Once all edge tiles are precisely cut and fitted, you are ready to move on to the final grouting stage that will complete your professional looking floor installation.
Step 5: Apply Grout and Clean the Surface
Grouting transforms your carefully laid tiles from a technical installation into a polished and professional looking floor. This final stage requires precision and patience to achieve a flawless finish that will protect and enhance your tiling work.
According to DIY Doctor, applying grout requires careful technique. Select a grout colour that complements your tiles and prepare the mixture according to manufacturer instructions. Using a rubber float held at a 45 degree angle, press the grout firmly into the tile joints ensuring complete coverage. Work systematically across small sections to prevent the grout from drying before you can clean excess material.
Once you have applied the grout, wait approximately 15 to 20 minutes for it to slightly set. Then use a damp sponge to carefully wipe away excess grout from tile surfaces. Make circular motions to clean without disturbing the grout lines. Rinse your sponge frequently in clean water to prevent spreading grout residue. After the initial cleaning, allow the grout to cure completely. A final buff with a dry microfibre cloth will remove any remaining grout haze and leave your tiles looking pristine.
Warning: Do not oversaturate your sponge when cleaning grout. Too much water can weaken the grout mixture and compromise its integrity.
With grouting complete, your floor is now ready for final inspection and enjoyment. Allow 24 to 48 hours for the grout to fully cure before placing heavy furniture or walking extensively on the newly tiled surface.
Step 6: Inspect and Finish the Tiled Floor
The final stage of your tiling project transforms your technical installation into a stunning floor that will enhance your space for years to come. This crucial inspection and finishing process ensures every detail meets professional standards.
According to DIY Doctor, once the grout has completely dried, conduct a meticulous floor inspection. Use natural daylight or bright lighting to reveal any subtle imperfections. Check for uneven tile edges, grout inconsistencies or small gaps that might have been missed during installation. Gently run your hand across the surface to feel for any raised tiles or uneven sections. Use a sharp blade to carefully remove any excess dried grout from tile edges and clean any residual film with a specialised tile cleaning solution.
Consider applying a quality tile sealant to protect your newly installed floor. This additional layer will enhance the tiles resistance to stains and moisture while making future cleaning easier. Work systematically using a foam applicator or roller to ensure even coverage. Pay extra attention to grout lines which are more vulnerable to moisture and potential staining. Allow the sealant to dry completely according to manufacturer instructions before walking on the surface or placing furniture.
Warning: Rushing the final inspection can lead to long term issues. Take your time and address even minor imperfections before considering the project complete.
With your floor now professionally finished and sealed, you can step back and appreciate the transformation you have achieved through careful planning and precise execution.
Elevate Your Floor Tiling Project with Premium Tiles and Expert Support
Achieving a flawless tile installation requires more than careful planning and precise technique. You need the right quality tiles that perfectly match your design vision while standing up to everyday wear. Whether you are tackling subfloor preparation, grout application or perfect tile cuts, having reliable tile options can make all the difference. Avoid common issues like uneven surfaces and premature wear by choosing from a wide range of durable and stylish tiles suited to your specific project needs.

Explore our extensive collection of premium porcelain, natural stone, wood effect and outdoor tiles designed for professional results and lasting beauty. Visit Vividotiles.co.uk today to find budget-friendly tiles with superior quality. Start your effortless tiling journey now and take advantage of free UK delivery on many products. Discover how straightforward your floor transformation can be with the right materials and expert guidance by browsing our full range at Vividotiles.co.uk. Ready for a stunning, durable floor? The perfect tile selection is just a click away.
Frequently Asked Questions
What steps should I follow for a flawless tile installation?
To achieve flawless tile installation, follow these key steps: assess and prepare the subfloor, plan and mark the tile layout, mix adhesive and lay tiles, cut and adjust tiles for edges, apply grout and clean the surface, and finally, inspect and finish the tiled floor. Start by thoroughly cleaning the subfloor and checking for any damage before moving on to layout marking.
How do I ensure my subfloor is ready for tiling?
Ensure your subfloor is ready by cleaning it thoroughly, checking for unevenness, and addressing any cracks or damage. Use a spirit level to confirm flatness, aiming for no more than a 3mm gap under a 2m straight edge.
What is the proper technique for mixing and applying tile adhesive?
Mix tile adhesive according to the manufacturer’s instructions, ensuring a consistent texture. Hold the trowel at a 45-degree angle when spreading, working in small sections to prevent drying out, and press each tile firmly into the adhesive with a twisting motion for maximum contact.
How can I achieve straight tile cuts along edges and obstacles?
Achieve straight cuts by measuring accurately and using a robust tile cutter or wet saw. Mark the tile before cutting, apply steady pressure, and consider using tile nippers for complex cuts around fixtures, ensuring you leave a small gap for adjustment.
What should I do after applying grout to ensure a professional finish?
After applying grout, wait 15 to 20 minutes for it to slightly set, then use a damp sponge to wipe away excess grout gently. Make circular motions while cleaning, rinsing the sponge frequently, to prevent spreading grout residue and ensuring a polished appearance.
How can I inspect my completed tiling job for any imperfections?
Inspect your completed tiling job by using bright lighting to reveal any uneven edges, grout inconsistencies, or missed gaps. Run your hand across the surface to feel for imperfections and address any issues before sealing the tiles to ensure a long-lasting, flawless finish.