
Floor Tile Replacement Guide: Achieve Perfect Results Easily
Replacing floor tiles can feel like a major task, yet almost 40 percent of DIY tile projects fail because of missed preparation steps. A flawless tile installation starts long before the first tile is laid. Careful preparation, safe removal, and precise placement are the keys to lasting results. This guide breaks down each essential step so you can achieve a professional finish and avoid common mistakes along the way.
Table of Contents
- Step 1: Assess And Prepare The Tile Area
- Step 2: Remove Damaged Floor Tiles Safely
- Step 3: Clean And Level The Subfloor Properly
- Step 4: Install New Floor Tiles Accurately
- Step 5: Grout And Finish The Tile Surface
- Step 6: Inspect And Ensure Quality Results
Quick Summary
| Key Point | Explanation |
|---|---|
| 1. Assess the Tile Area Thoroughly | Check for damages, moisture, and irregularities to ensure a strong foundation for your new tiles. |
| 2. Prioritize Safety During Tile Removal | Use protective gear and assess for hazards, especially if your home was built before 1999. |
| 3. Ensure a Clean and Level Subfloor | Remove dust and use a self-levelling compound for an even surface to support your new tiles. |
| 4. Create a Detailed Installation Plan | Mark the center and layout your tiles dry to ensure alignment and minimize waste during installation. |
| 5. Conduct a Final Quality Inspection | Examine alignment and grout consistency closely to catch any issues before the project concludes. |
Step 1: Assess and Prepare the Tile Area
Before beginning your floor tile replacement project, you need to thoroughly assess and prepare the existing tile area. This critical first step ensures a smooth, professional installation and prevents future complications.
According to Tiles.org.uk, substrate evaluation is paramount. Start by conducting a comprehensive inspection of your current floor surface. Look for signs of damage such as cracks, uneven areas, moisture stains, or loose tiles. Run your hand across the surface to check for subtle irregularities that could impact your new tile installation. Carefully remove any damaged tiles and assess the underlying substrate for structural integrity.
Cleaning and preparation are key components of a successful tile replacement. Historic England recommends thorough surface cleaning to remove dirt, grease, and old adhesive residue. Use a degreasing solution and scrub the area meticulously. If you’re working with an older surface, consider using a specialised cleaning agent that won’t damage the substrate. Once cleaned, allow the surface to dry completely before proceeding with measurements and tile layout.
A pro tip: Always check for levelness using a spirit level. Uneven surfaces can lead to tile lippage - where tiles are not flush with each other - which can ruin the aesthetic and functionality of your new floor. If significant unevenness exists, you might need to use a floor levelling compound before installation.
With your area thoroughly assessed and prepared, you’re now ready to move on to the next crucial step: selecting and planning your tile layout.
Step 2: Remove Damaged Floor Tiles Safely
Removing damaged floor tiles requires careful preparation and precise technique to ensure a clean and safe removal process. This step is crucial for creating a smooth surface for your new tile installation.
Health and Safety Executive emphasises the critical importance of safety when removing floor tiles. Before starting, perform a preliminary assessment to identify potential hazards. If your property was built before 1999, there is a possibility of asbestos containing materials. Always wear protective equipment including safety glasses, dust masks, sturdy gloves, and knee pads. Work in a well ventilated area and cover nearby surfaces to prevent dust and debris spread.
To remove damaged tiles, start by gathering essential tools a hammer, chisel, putty knife, and protective scraper. Begin at the edge of a damaged tile by carefully inserting the chisel underneath and gently tapping with the hammer. Apply steady but controlled pressure to lift the tile without damaging the underlying surface. For stubborn tiles, use a heat gun to soften the adhesive which can make removal easier. Work methodically across the area removing tiles in sections.
A critical warning from UK Asbestos Training Association: if you suspect asbestos in your floor tiles, do not attempt removal yourself. Contact a professional asbestos removal specialist who can safely handle and dispose of potentially hazardous materials.
Once all damaged tiles are removed, thoroughly clean the surface removing any remaining adhesive or grout. This prepares you for the next step of assessing and preparing the substrate for new tile installation.
Step 3: Clean and Level the Subfloor Properly
Preparing a clean and level subfloor is essential for achieving a professional tile installation that looks and performs flawlessly. This critical step ensures your new tiles will be stable, secure, and visually appealing.
According to Tiles.org.uk, thorough cleaning and preparation are paramount for successful tile installation. Begin by removing all dust, debris, and loose particles using a heavy duty vacuum and stiff bristled brush. Pay special attention to corners and edges where dirt tends to accumulate. Next, use a degreasing cleaner to remove any oil, wax, or adhesive residue that could compromise tile adhesion. Rinse the surface thoroughly and allow it to dry completely before proceeding.
Historic England recommends careful assessment of the subfloor for levelness. Use a long spirit level or straightedge to identify uneven areas. Small imperfections can be addressed with a self levelling compound specifically designed for flooring applications. Pour the compound carefully, spreading it evenly across the surface using a gauge rake. Allow the compound to settle and dry according to manufacturer instructions.
Pro tip: Temperature and humidity significantly impact levelling compounds. Work in a well ventilated area with consistent temperature between 10 and 25 degrees Celsius for optimal results. Avoid applying levelling compound in direct sunlight or extremely humid conditions.
With your subfloor now clean and level, you are ready to move forward with tile layout and installation preparation.
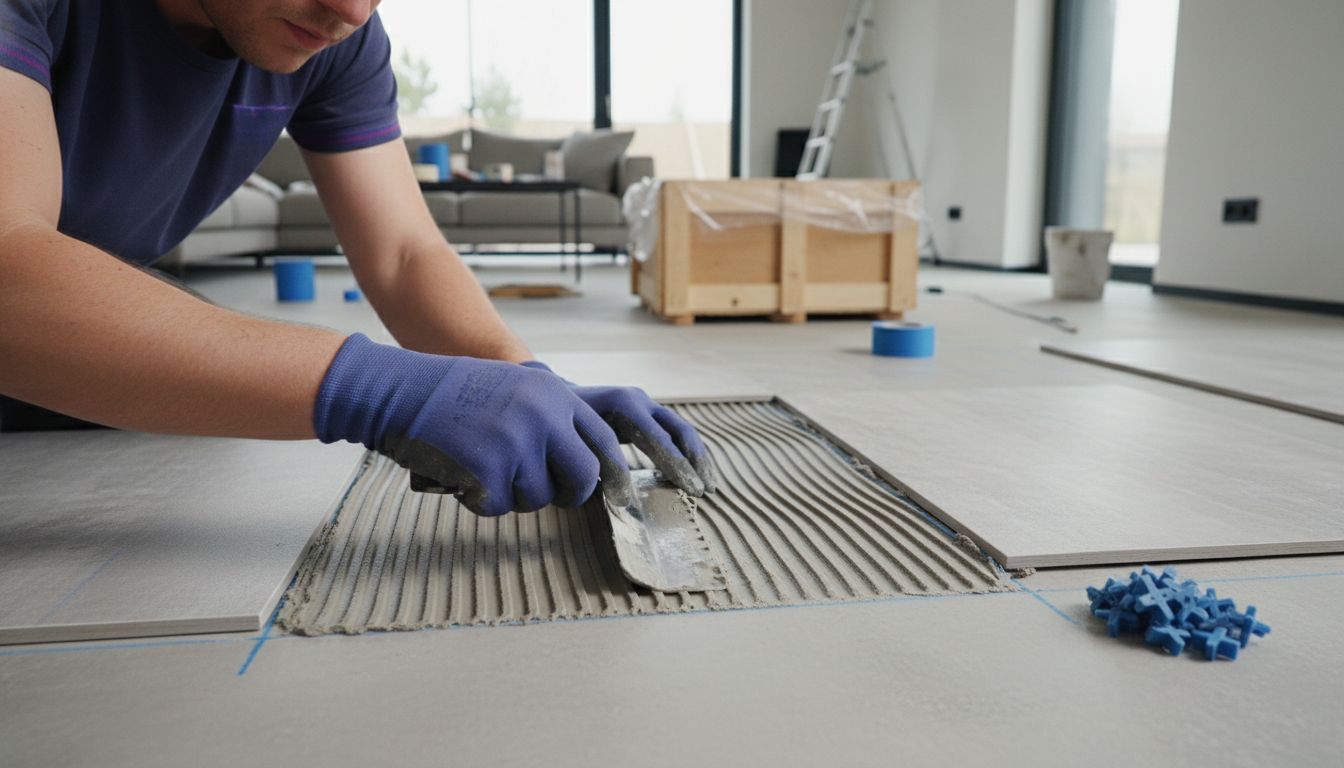
Step 4: Install New Floor Tiles Accurately
Installing new floor tiles requires precision, patience, and a systematic approach to achieve a professional looking result. Your goal is to create a seamless floor surface that looks stunning and performs perfectly.
Tiles.org.uk recommends starting with a comprehensive layout plan. Begin by finding the room’s centre point and creating perpendicular reference lines using a chalk line. This ensures your tiles are aligned symmetrically. Dry lay your tiles first without adhesive to confirm the design and make necessary adjustments. Measure and mark cutting lines for tiles that need to fit around edges or obstacles.
When applying adhesive, work in small sections to prevent it from drying before tile placement. Use a notched trowel held at a 45 degree angle to spread adhesive evenly. DIY Doctor suggests using a manual tile cutter or wet saw for precise cuts, especially around corners and fixtures. Press tiles firmly into the adhesive, using spacers to maintain consistent gaps for grouting.
Tap tiles gently with a rubber mallet to ensure they are level and fully embedded.
Pro tip: Always wear knee pads and work systematically from the centre outwards. This approach helps maintain alignment and reduces the likelihood of uneven tile placement.
After installation, allow the adhesive to set completely before proceeding to the grouting stage. Your newly installed floor is taking shape.
Step 5: Grout and Finish the Tile Surface
Grouting is the final transformative step that turns individual tiles into a seamless, professional floor surface. This process not only fills the gaps between tiles but also provides essential protection and aesthetic refinement.
Tiles.org.uk recommends selecting a grout colour that complements your tile design and suits your overall room aesthetic. Before application, ensure the tile adhesive has completely dried. Use a rubber grout float held at a 45 degree angle to spread grout diagonally across the surface, pressing firmly to fill all joints completely. Work in small sections to prevent the grout from drying before you can clean excess material.
Historic England emphasises the importance of careful cleaning after grouting. After initial application, wait approximately 15 minutes for the grout to slightly set. Then use a damp sponge to wipe away excess grout from tile surfaces, rinsing the sponge frequently to prevent residue buildup. Make multiple gentle passes to achieve a clean finish without disturbing the grout lines.
Pro tip: Seal your grout lines after 48 hours to protect against staining and moisture penetration. Use a professional grade grout sealer applied with a small brush or applicator for best results.
With grouting complete, your new floor tile installation is now ready to be admired and enjoyed.
Step 6: Inspect and Ensure Quality Results
Your floor tile replacement project is nearly complete, and a thorough final inspection will ensure professional results that stand the test of time. This critical evaluation step helps identify and address any potential issues before they become long term problems.
Tiles.org.uk recommends a systematic approach to quality assessment. Begin by examining the entire surface in natural and artificial light, looking for consistent tile alignment, even grout lines, and any visible lippage between tiles. Check that tiles are firmly embedded without hollow sounds when tapped. Measure the gaps between tiles to confirm uniform spacing and verify that the grout lines are straight and clean.
Historic England emphasises the importance of comprehensive visual and tactile inspection. Run your hands gently across the surface to detect any uneven areas or protruding edges. Look for potential stress points around edges, corners, and high traffic areas. Pay special attention to areas near doorways, fixtures, and transitions between different flooring surfaces where tile installation can be most challenging.
Pro tip: Use a bright torch or work light at an angle to highlight subtle imperfections that might be invisible under normal lighting conditions. This technique can reveal minor alignment issues or grout inconsistencies that need addressing.
With your meticulous inspection complete, you can confidently enjoy your newly transformed floor space.
![]()
Transform Your Floor Tile Replacement with Premium Tiles from Vividotiles
Replacing floor tiles can feel overwhelming, especially when you strive for perfect alignment, seamless grout lines, and a long-lasting finish. From assessing and preparing your subfloor to carefully installing and grouting your new tiles, every step demands attention to detail and quality materials. If you want to avoid common problems like uneven surfaces or tile lippage, choosing the right tiles is crucial.

Discover a wide selection of high-quality tiles at Vividotiles.co.uk that can turn your floor transformation into a confident and rewarding experience. Whether you prefer porcelain, natural stone, or wood effect styles, our affordable options bring both durability and style to your project. Start planning your tile replacement today with expert guidance and enjoy free UK delivery on many products. Visit Vividotiles now and take the first step towards flawless flooring that will impress for years to come.
Frequently Asked Questions
How do I assess the condition of my existing floor tiles before replacement?
To assess your existing floor tiles, inspect for damage such as cracks, loose tiles, and moisture stains. Look for irregularities by running your hand across the surface, and prepare to remove any damaged tiles before starting your replacement project.
What safety precautions should I take when removing old floor tiles?
Wear protective gear, including safety glasses, dust masks, and gloves, to ensure your safety while removing old floor tiles. If your building was constructed before 1999, test for potential asbestos presence before beginning the removal process.
How can I ensure my subfloor is clean and level before installing new tiles?
Remove all debris and clean the subfloor using a heavy-duty vacuum and degreaser to eliminate any residues. Use a spirit level to check for uneven areas and apply a self-levelling compound if necessary to create a smooth, flat surface.
What is the correct technique for grouting to achieve a professional finish?
To grout effectively, use a rubber float to spread grout diagonally across the tiles while ensuring all joints are filled. After allowing the grout to set for about 15 minutes, clean excess grout from the tile surfaces with a damp sponge for a neat finish.
How do I perform a final quality inspection after tiling?
Conduct a thorough inspection by examining tile alignment, grout lines, and checking for lippage or uneven surfaces in both natural and artificial light. Run your hands across the surface to feel for imperfections and confirm that the grout lines are straight and clean.